# Media Library
The Media Library is your centralized hub for managing all your media files. Designed to streamline content organization, this page ensures your video assets are always accessible and easy to manage.
**Key Highlights:**
* **Organize with Ease:** Keep all your media in one place for better visibility and control.
* **Searching & Filtering:** Quickly locate specific files using filters, labels, and search options.
* **Seamless Uploading & Editing:** Upload new video effortlessly and make quick edits to existing videos directly within the library.
* **Comprehensive Media Management:** Rename, categorize, and optimize your videos for better project alignment.
For detailed insights into each feature, explore the dedicated sections for uploading, editing, filtering, and searching features.
# Upload Videos
### **How to Upload Your First Video to Your Media Library**
Follow these steps to upload your first video to the Media Library:
#### **Step 1**
\- Click on the 'Upload Videos Now' CTA on your media library page.
#### Step 2
\- Simply drag your videos into the upload pop-up window or you can click on 'Browse Files' CTA to upload videos from your device.
***
### How To Upload Video By Drag & Drop
\- You can simply drag & drop your desired video from your device.
\- The video will start uploading in the dashboard automatically.
\- Once the video is uploaded successfully, you will be able to access the video for editing and publishing purposes.
***
### How To Upload Videos With 'Browse Files' Button
\- To upload videos from your device, click on the 'Browse Files' button.
\- Select one or more videos from your device & click 'Open' button to uplaod videos into the dashboard.
\- The video will start uploading in the dashboard automatically.
\- Once the videos are uploaded successfully, you will be able to access the video for editing and publishing purposes.
***
### How To Make Your Uploaded Videos Public
\- Once the videos are uploaded, by default the videos are set to private mode. Click on the thumbnail 'Make Public' button to make the video public.
\- Or you can hover over the thumbnail to select multiple videos and bulk edit the visibility.
#### Step 1
\- Select video(s) and hover over the 'Eye' icon to change visibility.
#### Step 2
\- Click on 'Private' or 'Public' radio button to set the status. Click 'Apply' to save.
#### Step 3
\- The video status will be saved and reflected in the dashboard.
# Edit Videos
**To select videos, follow these steps:**
* Hover over the video you want to select.
* Click on the checkbox on top left of the video tile
* The checkboxes will appear on all the video tiles available on that page
* You can select multiple videos now
* You can modify labels, change visibility or choose to delete the selected videos
# Rename a video
### **How To Rename A Video From Your Media Library**
The dashboard automatically saves the video by the default name fetched from source, to rename the video title, follow these steps:
#### Step 1
\- Select a video from your media library to open the Edit Pop-Up window.
#### Step 2
\- Rename the video title with relevant video name as per your requirement.
#### Step 3
\- Click on 'Save' button to save the name.
# Add labels
### How To Add Labels For Videos
Follow these steps to add labels:
#### Step 1
\- Select a video from your media library to open the Edit Pop-Up window.
#### Step 2
\- You can type video-relevant keywords to highlight the category/topic of the video. Press 'Enter' key to seperate labels.
#### Step 3
\- Click on 'Save' button to save the labels.
# Tag products
### How To Tag Products To Videos
Follow these steps to tag products:
#### Step 1
\- Select a video from your media library to open the Edit Pop-Up window. Click on 'Add Products' button to tag products to your video.
#### Step 2
\- Click on 'Add Products' to access your store catalogue.
#### Step 3
\- Search the relevant product/products and select them to add products to the video. Click on 'Done' button on the top right corner to save the changes.
#### Step 4
\- The products are now added to the video.
# Select Thumbnails
### How To Change Thumbnails For Your Videos
By default the video will have a thumbnail. Follow these steps to change thumbnail if necessary:
### How To Pick Thumbnail From Video
#### Step 1
\- Select a video from your media library to open the Edit Pop-Up window. And click on 'Select' button next to the thumbnail section.
#### Step 2
\- Pick any suitable frame for the thumbnail. Proceed to click 'Save & Continue' button.
#### Step 3
\- Changes are saved for the video.
***
### How To Upload Thumbnail From Your Device
#### Step 1
\- Select a video from your media library to open the Edit Pop-Up window. And click on 'Upload' button next to the thumbnail section.
#### Step 2
\- Select relevant image to set as video thumbnail from your device and click 'Open' button.
#### Step 3
\- Crop image as per requirement and click on 'Save & Continue' to save changes to your thumbnail.
#### Step 4
\- Thumbnail chnages are saved and now you can save the video with modified video edits.
# Visibility
### How To Change Visibility Status For Videos
Follow these steps to change visibility:
#### Step 1
\- Select a video from your media library to open the Edit Pop-Up window.
#### Step 2
\- Click on 'Private' or 'Public' radio button to set the status. Click 'Save' button to save.
***
### How To Make Videos Public From Media Library
\- Once the videos are uploaded, by default the videos are set to private mode. Click on the thumbnail 'Make Public' button to make the video public.
\- Or you can hover over the thumbnail to select multiple videos and bulk edit the visibility.
#### Step 1
\- Select video(s) and hover over the 'Eye' icon to change visibility.
#### Step 2
\- Click on 'Private' or 'Public' radio button to set the status. Click 'Apply' button to save.
#### Step 3
\- The video status will be saved and reflected in the dahboard.
# Search and Filter
### How To Use Search In The Media Library
\- Click on 'Search' text box on top right corner & type your video title to find your desired video asset.
### How To Use Filter In The Media Library
\- You will be able to filter your videos with 'Labels' and/or 'Status'
\- In order to filter your video assets with the help of Labels, you will have to create labels. Check how to create labels here.
### How To Filter with Labels
#### Step 1
\- Click on the 'Filter' icon on the top right corner.
#### Step 2
\- Click on the 'Labels' to choose one or more labels from the dropdown options.
#### Step 3
\- Click on 'Apply' button to view your search results.
### How To Filter with Status
#### Step 1
\- Click on the 'Filter' icon on the top right corner.
#### Step 2
\- Click on the 'Status' to choose from 'Public' status or 'Private' status or both together.
#### Step 3
\- Click on 'Apply' button to view your search results.
# Shoppable Videos
### How To Convert Video Into Shoppable Videos
Follow these steps to convert videos to shoppable videos:
#### Step 1
\- Click on 'Select Videos to Make Them Shoppable' button to get started.
#### Step 2
\- Your media library will open in a pop-up window. Select the video to which products should be added. Click 'Next' button to proceed further.
#### Step 3
\- Click on 'Add Products' to access your store catalogue.
#### Step 4
\- Search the relevant product/products and select them to add products to the video. Click on 'Done' button on the top right corner to save the changes.
#### Step 5
\- The products are now added to the video. Click 'Save' button to save the shoppable video.
# Branching Videos
Branching Videos guide your audience on a personalized journey, allowing them to choose their own path and discover relevant content. It leads to enhanced viewer engagement and drives sales by connect
• Click on **Branching Videos** from the left navigation bar, then select **Create New** to begin.
• A screen will appear prompting you to **Add Video** on the screen, with the options below it.
• Select the video you want to upload
• When a video is uploaded, you need to select options indicating what you want, as this will act as a parent video.
• Now, you need to add options for both nodes that are linked to a parent video.
• Now, when you click on the nodes, you will see three choices: **video, URL, or delete**. It's up to you to decide which one to select.
• If you choose "**Video,**" you can add additional child videos. If you choose "**URL**," it will automatically be redirecting you to the website. For example, if you choose "Video," you will have to add the next video you want the user to redirect to.
• If you choose "URL," you will have to add the URL link where you want the user to redirect to.
• Click on **Share**, enter a title, and then click **Save** to create your branching video.
• After creating your branching video, you need to create a section layout where you can include the video. This will ensure that the branching video is visible within the selected section layout on your site. To create a layout click on **Section Layouts** from the left navigation bar.
• Select your preferred layout from the options shown. You will be redirected to a page where you can add your branching videos by clicking on '**Add Videos'.**
• Select the video and click to **add it to the section**.
• To make the section layout live on your website, click **'Publish'**. To set up Live2.ai for your store, you will have to follow the steps: Steps 1 and 2 are one-time tasks, and after that, you’ll only need to complete Step 3 for future updates.
• Once done, click on '**Next,**' copy the publish '**ID,**' and mark it as done.
• For the next steps, follow the same integration process as explained in **Site Sections integration. Add a section** from your shopify store, under apps click on "**Live2 Embed**," and **paste the embed ID** that you copied previously. Once done, **save** the changes, and your branching videos will go live on your website.
# Interactive Elements
For any videos that you upload, you will be able to add interactive elements to make them engaging. These are the interactive features:
1. Polls
2. MCQs
3. QnA
4. CTA
5. Interactive Stickers
6. Frames
# Polls
### **How To Add Polls To Videos**
On the left sidebar, you will be able to find the 'Polls' page. Follow these steps to add Polls to videos:
#### **Step 1**
\- Click on 'Create Polls' button to get started.
#### **Step 2**
\- A pop-up window open with a poll form. Fill in all the necessary information and set date for a defined timeline for poll to exist on videos. Click on 'Save and continue' to proceed.
#### **Step 3**
\- Now you have to add videos on which the polls should exist. Click on ' + Add Videos' button on the top right corner.
#### **Step 4**
\- Select one or multiple videos to add your poll to them. Click 'Add To Campaign' button to proceed further.
#### **Step 5**
\- Once you are happy with the videos, click on 'Run Campaign' button on the top right corner to save the campaign.
#### **Step 6**
\- Your poll campaign is now active. You will be able to see the performance and information under the polls page.
# MCQs
### **How To Add MCQs To Videos**
On the left sidebar, you will be able to find the 'MCQs' page. Follow these steps to add Multiple Choice Questions to videos:
#### **Step 1**
\- Click on 'Create MCQs' button to get started.
#### **Step 2**
\- A pop-up window open with a MCQs form. Fill in all the necessary information and set date for a defined timeline for MCQs to exist on videos. Click on 'Save and continue' to proceed.
#### **Step 3**
\- Now you have to add videos on which the MCQs should exist. Click on ' + Add Videos' button on the top right corner.
#### **Step 4**
\- Select one or multiple videos to add your MCQs to them. Click 'Add to Campaign' button to proceed further.
#### **Step 5**
\- Once you are happy with the videos, click on 'Run Campaign' button on the top right corner to save the campaign.
#### **Step 6**
\- Your MCQs campaign is now active. You will be able to see the performance and information under the MCQs page.
# QnAs
### **How To Add QnAs To Videos**
On the left sidebar, you will be able to find the 'QnA' page. Follow these steps to add Question & Answer interaction to videos:
#### **Step 1**
\- Click on 'Create Q\&As' button to get started.
#### **Step 2**
\- A pop-up window open with a QnA form. Fill in all the necessary information and set date for a defined timeline for QnA to exist on videos. Click on 'Save and continue' to proceed.
#### **Step 3**
\- Now you have to add videos on which the QnA should exist. Click on ' + Add Videos' button on the top right corner.
#### **Step 4**
\- Select one or multiple videos to add your QnA to them. Click 'Add to Campaign' button to proceed further.
#### **Step 5**
\- Once you are happy with the videos, click on 'Run Campaign' button on the top right corner to save the campaign.
#### **Step 6**
\- Your QnA campaign is now active. You will be able to see the performance and information under the QnA page.
# CTA
### **How To Add CTA To Videos**
On the left sidebar, you will be able to find the 'CTA' page. Follow these steps to add Call To Actions to videos:
#### **Step 1**
\- Click on 'Create CTA' button to get started.
#### **Step 2**
\- A pop-up window open with a CTA form. Fill in all the necessary information and set date for a defined timeline for CTA to exist on videos. Click on 'Save and continue' to proceed.
#### **Step 3**
\- Now you have to add videos on which the CTA should exist. Click on ' + Add Videos' button on the top right corner.
#### **Step 4**
\- Select one or multiple videos to add your CTA to them. Click 'Add to Campaign' button to proceed further.
#### **Step 5**
\- Once you are happy with the videos, click on 'Run Campaign' button on the top right corner to save the campaign.
#### **Step 6**
\- Your CTA campaign is now active. You will be able to see the performance and information under the CTA page.
# Stickers
### **How To Add Interactive Stickers To Videos**
On the left sidebar, you will be able to find the 'Stickers' page. Follow these steps to add interactive stickers to videos:
#### **Step 1**
\- Click on 'Select Videos To Add Stickers' button to get started.
#### **Step 2**
\- Select any video and click on 'Next' button to add interactive sticker.
#### **Step 3**
\- Select a sticker of your preference and click on it to add to video.
***
### How To Redirect Sticker To Any URLs
#### Step 1
\- Select the 'URL' radio button and paste any URL in the pop-up window. Click 'Done' button to save the sticker.
#### Step 2
\- Now the sticker is clickable and interactive.
***
### How To Add Products To Your Stickers
#### Step 1
\- Select the 'Product' radio button and. Click 'Done' button to save the sticker.
#### Step 2
\- Now the sticker is clickable and interactive.
# Frames
### **How To Add Frames To Videos**
On the left sidebar, you will be able to find the 'Frames' page. Follow these steps to add frames to videos:
#### **Step 1**
\- Click on 'Select Videos To Add Frames' button to get started.
#### **Step 2**
\- Select any video and click 'Next' button to add frames.
#### **Step 3**
\- Choose any one from the range of frames to suit the selected video. Click on 'Save' button.
#### **Step 4**
\- The video is saved with a frame and the video is displayed with it in all active sections.
# Customisation
Live2.ai dashboard allows you to customise the UI to match your website layouts and designs without any help from the developer. You will be able to customise:
1. General
2. Site Sections
3. Video Player
4. Interactive Video
# General
Follow these steps to customise the general brand colors and fonts primarily used on the Call To Action buttons.
### How To Change Primary Color
\- You can either select a color from the color picker or enter the HEX code of the desired color into the text box.
***
### How To Change Primary Text Color
\- You can either select a color from the color picker or enter the HEX code of the desired color into the text box.
***
### How To Change Secondary Color
\- You can either select a color from the color picker or enter the HEX code of the desired color into the text box.
# Site Sections
Follow these steps to customise the site section layouts.
### How To Customise Carousel Layout
#### To Customise Carousel View
\- You can customise card width, gap between videos and video card border radius. You can also toggle to show or hide the video name and customise the font size.
#### To Customise Section Title
\- You can toggle to show or hide the title and customise the font size, font weight and font color and opacity.
#### To Customise Section Sub-Title
\- You can toggle to show or hide the sub-title and customise the font size, font weight and font color and opacity.
#### To Customise Section Text Alignment
\- You can align the text to left, center or right.
#### To Customise Play Button
\- You can choose any one of the play button designs to change the play button.
#### To Customise Carousel Layout On Mobile Device
\- All the above customisation is available to adapt mobile devices as well.
***
### How To Customise Story Layout
#### To Customise Story View
\- You can customise card width, gap between videos, story highlight colour and video card border radius. You can also toggle to show or hide the video name and customise the font size.
#### To Customise Section Title
\- You can toggle to show or hide the title and customise the font size, font weight and font color and opacity.
#### To Customise Section Sub-Title
\- You can toggle to show or hide the sub-title and customise the font size, font weight and font color and opacity.
#### To Customise Section Text Alignment
\- You can align the text to left, center or right.
#### To Customise Play Button
\- You can choose any one of the play button designs to change the play button.
#### To Customise Story Layout On Mobile Device
\- All the above customisation is available to adapt mobile devices as well.
***
### How To Customise Window Story Layout
#### To Customise Window Story View
\- You can customise card width, gap between videos, story highlight colour and video card border radius. You can also toggle to show or hide the video name and customise the font size.
#### To Customise Section Title
\- You can toggle to show or hide the title and customise the font size, font weight and font color and opacity.
#### To Customise Section Sub-Title
\- You can toggle to show or hide the sub-title and customise the font size, font weight and font color and opacity.
#### To Customise Section Text Alignment
\- You can align the text to left, center or right.
#### To Customise Play Button
\- You can choose any one of the play button designs to change the play button.
#### To Customise Window Story Layout On Mobile Device
\- All the above customisation is available to adapt mobile devices as well.
***
### How To Customise Floating Layout
#### To Customise Floating View
\- You can customise card width and video card border radius.
#### To Customise Placement
\- You can adjust the pip alignment position to left or right side of the page. You can also customise the side and bottom padding.
#### To Customise Section Sub-Title
\- You can toggle to enable or disable the floating icon.
#### To Customise PIP Layout On Mobile Device
\- All the above customisation is available to adapt mobile devices as well.
***
### How To Customise Group Story Layout
#### To Customise Group Story View
\- You can customise card width, gap between videos, story highlight colour and video card border radius. You can also toggle to show or hide the video name and customise the font size.
#### To Customise Section Title
\- You can toggle to show or hide the title and customise the font size, font weight and font color and opacity.
#### To Customise Section Sub-Title
\- You can toggle to show or hide the sub-title and customise the font size, font weight and font color and opacity.
#### To Customise Section Text Alignment
\- You can align the text to left, center or right.
#### To Customise Play Button
\- You can choose any one of the play button designs to change the play button.
#### To Customise Group Story Layout On Mobile Device
\- All the above customisation is available to adapt mobile devices as well.
# Video Player
Follow these steps to customise the video player.
### How To Customise Video Player
\- You can customise the video name font size by adjusting and dragging the slider or entering the pixel in the text box.
### How To Customise Video Player
\- You can customise CTA text and toggle to show or hide the offer tag.
### How To Customise Product Detail
\- You can customise CTA text and toggle to show or hide the offer tag.
### How To Customise Video Player On Mobile Device
\- All the above customisation is available to adapt mobile devices as well.
# Interactive Video
Follow these steps to customise interactive videos.
### How To Customise Poll
#### To Customise Question
\- You can customise font size, background color & opacity and CTA color and opacity.
#### To Customise Options
\- You can customise font size by dragging the slider or entering the pixel in the text box.
#### To Customise Poll On Mobile Device
\- All the above customisation is available to adapt mobile devices as well.
***
### How To Customise MCQ
#### To Customise Question
\- You can customise font size, background color & opacity and CTA color and opacity.
#### To Customise Options
\- You can customise font size by dragging the slider or entering the pixel in the text box.
#### To Customise MCQ On Mobile Device
\- All the above customisation is available to adapt mobile devices as well.
***
### How To Customise CTA
#### To Customise Question
\- You can customise font size, background color & opacity and CTA color and opacity.
#### To Customise CTA On Mobile Device
\- All the above customisation is available to adapt mobile devices as well.
# Section Layouts
Section Layouts are collections of videos that can be embedded into your website or app. You can create a site section by choosing one of our templates and manually adding the videos you want.
The 4 section layouts available are -
1. Carousal
2. PIP
3. Grid
4. Window Stories
# Create & Publish
### How to create a new Section Layout
On the left sidebar, you will be able to find the 'Section Layouts' tab. Follow these steps to create a new section layout:
#### Step 1
Choose a section from the given options to display your videos on site.
#### Step 2
Now you have to add videos into the selected section layout. Click on ' + Add Videos' button on the top right corner.
#### Step 3
Select one or multiple videos to add to your section layout. Click 'Add To Section' button to proceed further.
#### Step 4
A draft version of your section layout is now created and ready to be published.
***
### How to Publish a Draft Section
On the left sidebar, you will be able to find the 'Section Layouts' tab. Follow these steps to publish a draft section:
#### Step 1
Select and open a draft section from the 'Section Layout' page.
#### Step 2
Click on the 'Publish' button on the top right corner.
#### Step 3
A pop-up window will appear on your screen with a step-by-step guide on how to embed the site section on your website. Ensure that the Live2.ai app is installed on your account.
#### Step 4
Continue following the pop-up window guide and add a Live2.ai embed section within any of your preferred website pages.
#### Step 5
Copy the unique Publish ID from the pop-up window and paste it in the embed section within your website. Click on 'Done' button once the section is live.
#### Step 6
Your Section Layout is now Active.
# Duplicate a Section Layout
### How to Duplicate a Section Layout
The dashboard enables you to duplicate an existing section layout, either as an exact replica or with a different layout while retaining the same set of videos. Follow these steps to duplicate a section layout:
#### Step 1
Open the desired section layout and click the dropdown menu next to its name.
#### Step 2
From the dropdown, click the 'Duplicate As' button and choose your preferred layout.
#### Step 3
A pop-up window will appear, prompting you to rename the duplicate. Enter the new name and click 'Duplicate' button.
#### Step 4
The duplicate section layout will be added to your Section Layout page.
# Manage Video Sequence
### How to Manage Video Sequence within Section Layout
The videos within a section layout can be rearranged. follow the steps to rearrange the videos within a section layout
#### Step 1
Open an existing section layout and click the 'Manage Sequence' button to enable manual rearrangement.
#### Step 2
Drag and drop the videos into your desired order. Once the arrangement is complete, click the 'Save' button.
#### Step 3
The updated sequence will be saved and reflected in your section layout.
# Update Section Layout Status
### How to Pause a Section Layout
An active section layout can be paused from the dashboard, affecting its visibility on your website. Follow these steps to pause a section layout:
#### Step 1
Open an active section layout and click the 'Pause' button in the top-right corner.
#### Step 2
A confirmation pop-up will appear. Click the 'Confirm' button to pause the section layout.
#### Step 3
The section layout is now paused and its updated status will reflect on your website.
***
### How to Resume a Section Layout
A paused section layout can be resumed, restoring its visibility on your website. Follow these steps to resume a section layout:
#### Step 1
Click the 'Resume' button in the top-right corner of the section layout.
#### Step 2
The section layout is now active again, and the updated status will reflect on your website.
# 🚀 Watch & Learn
## Upload Your Videos
Easily upload videos from your device or import from YouTube, Vimeo, or other platforms.
{% file src="/files/f2DNwoLY4REjzpPj9HMI" %}
## Add Products or CTAs
Drag and drop interactive elements like product cards, buttons, or links directly to the video.
{% file src="/files/hlB0rHRX8ixkO66Rdegy" %}
## Publish
Embed your shoppable videos anywhere or share via link. Track performance in real-time.
{% file src="/files/uy7K9483E0iSn2WZc9jV" %}
# 🧩 Integration
# Shopify
After you’ve published the section layout on the Live2.ai dashboard and copied the Embed ID, follow these steps to integrate it into your Shopify store and make the embed live:
## Video Tutorial: Integration Guide
{% file src="/files/0tJrR4du1s3QqKliJoJJ" %}
## Detailed Walkthrough
Go to your shopify store, under Themes - click on customize - click "**Add section**".
* Click on **Apps**.
* Select Live2 Embed. Under "**Publish id" p**aste the id that you copied previously from the Live2.ai console dashboard.
* Save your changes and reload the page to apply and view your Section Layout live on the site.
# Magento
After you’ve published the section layout on the Live2.ai dashboard and copied the Embed ID, follow these steps to integrate it into your Magento store and make the embed live:
## Video Tutorial: Integration Guide
{% file src="/files/xF6LYGDzTryyNqApZRwf" %}
## Detailed Walkthrough
## Extension Installation Guide
### Step 1: Install Live2.ai Module
To begin, open your terminal and use Composer to add the Live2 extension to your Magento project by running:
```
composer require live2/live2
```
This command fetches and installs the Live2 module into your Magento setup.
### Step 2: Install Codebase and Database Schemas:
Next, you need to install the codebase and update the database schemas. Run the following commands sequentially in your terminal:
```php
php bin/magento setup:di:compile
php bin/magento setup:upgrade
php bin/magento setup:static-content:deploy -f
php bin/magento indexer:reindex
php bin/magento cache:clean
php bin/magento cache:flush
```
These commands will compile the code, update the database, deploy static content, reindex data, and clear caches.
### Step 3: Update Authorization Token
* After installing the Live2 extension, Obtain the authorization token provided by the Live2 team. Then, navigate to **Store -> Configuration.**
* Go to Live2 -> Live2 Token. In the URL enter [https://console.live2.ai](https://console.live2.ai/) and Token will be provided to you by Live2.ai at the time of integration.
### Step 4: To Embed Videos follow these steps:
* Go to **Content -> Pages**
* Select the page where you want to embed the video, click on Edit. For this example we are considering Home Page
* Click on Content -> Click on Insert Widget
* Select Live2 Widget from the dropdown, and enter the Embed Id generated from the Live2.ai console dashboard.
* After the Widget is successfully added click on Save
* Go to Content → Pages. Click on View for the page the embed was created.
* You will be able to see the preview of the live embed
### Step 5: Enable Product Sync
Enable the product synchronization feature to sync your catalog with Live2. Run the following command:
```
bin/magento live2:productSync
```
# Custom store
By embedding the Live2.ai JS script on your website, you gain access to various Live2.ai widgets to display embeds.
## Integration
Insert this code block in the \ of the page.
```
HTML:
```
To Position the Live2.ai component in the desired location insert the following code block in the \ of the page.
```
# 🔍 FAQs
## Product FAQs: Everything You Need to Know About Live2.ai Shoppable Videos
#### Can I connect my store to auto-fetch products?
Yes. You can connect your eCommerce store (e.g., Shopify, WooCommerce and more) to automatically pull product details and simplify tagging.
#### Do Shoppable Videos work on mobile?
Yes. All videos are fully responsive and optimized for mobile, tablet, and desktop.
#### Can I update product tags after a video is published?
Yes. Once your video is published and embedded, you can update product tags and CTAs without needing to re-upload the video or change the embed code.
#### Do I need any technical skills to get started?
Not at all. Live2.ai is built to be no-code/low-code and user-friendly. You can upload videos, tag products, and go live with just a few clicks.
#### What happens if I hit my video or bandwidth limits?
You’ll be notified as you approach your limits. You can upgrade to a higher tier at any time, or reach out to support for flexible options.
#### Does Live2.ai offer analytics?
Yes. You’ll get access to real-time insights including views, clicks, conversions, watch time, and product interactions—so you can optimize performance and understand viewer behavior.
#### Can I customize the look and feel of the video player?
Yes. You can fully customize the video player to match your brand—change colors, fonts, button styles, and more to create a seamless branded experience.
#### Is it possible to add custom CTAs or links in the videos?
Yes! You can add customizable call-to-action buttons, URLs and more—whether it's "Buy Now," "Learn More," or linking to a product page.
#### Can I use my own fonts and brand assets in the video overlays?
Yes. You can upload custom fonts, logos, and brand elements to ensure all overlays, tags, and CTAs align perfectly with your visual identity.
## AppSumo Users FAQs: Your Guide to Getting the Most Out of Your Deal
#### What happens after I purchase through AppSumo?
Once you purchase through AppSumo, you'll receive lifetime access to Live2.ai according to your chosen tier. There are no recurring fees or subscriptions. You'll be able to use the platform indefinitely with all updates included in your tier.
#### Is there a free trial?
No, but AppSumo offers a 60-day money-back guarantee! This gives you plenty of time to test Live2.ai and make sure it meets your needs. If you're not satisfied, you can get a full refund within the guarantee period.
#### Is this a one-time payment or a subscription?
This is a one-time payment through AppSumo. Once you purchase a license, you get lifetime access to Live2.ai—no recurring fees or hidden charges.
#### What’s included in the AppSumo deal?
Depending on the tier you choose, you’ll get access to a set number of videos, bandwidth, team members, and platform features. All plans include lifetime access, future updates, and full use of shoppable video capabilities.
#### Can I upgrade my plan later?
Yes! You can upgrade to a higher tier directly through AppSumo during the deal period.
#### Are future updates included?
Absolutely. Any platform updates or improvements released in the future will be included in your plan—no extra fees.
# Analytics
# Terminologies
#### Videos
All the video content in the format MP4 can be uploaded on the Live2.ai dashboard for further managing the Site Sections and Campaigns on your website.
#### Labels
Labels are tags that you can add to videos. They serve various purposes, such as categorizing videos and attaching custom data. Labels are particularly useful for organizing and managing your video library. You can use labels for filtering videos and creating automated lists, making it easier to find and organize your content.
#### Site Sections
Site sections are group of videos that you embed on to your website or app. There are multiple kind of site sections supported by Live2.ai. You can create a site section by manually selecting the videos you like, or providing a list of labels or both.
#### Campaigns
Campaigns are interactive elements on top of videos that let you make the most of your videos. You can ease the journey for your potential customers by redirecting them in just a click, quiz them about your projects, ask them their favourites, or make them vote.
# Stores
# Supported Stores
# Add a Store
# Shopify
# Magento
# Woo Commerce
# Big Commerce
# Sync Products
# Add to Cart
# Remove a Store
# Analytics
**To view analytics for a particular section from the Site Section itself:**
* Click on "Analytics" in the Top Right corner
* Select the timeline required for the data from the drop down on top right of the page
* View all the details from the collection page
**To view overall analytics:**
* Click on "Analytics" from the menu bar
**To view video analytics:**
* Click on "Videos" tab from the menu
* Click on the Particular video you wish to see the analytics for
* Click on "View Analytics" to view overall video insights
* Click on "Analytics" from the menu bar
* You can also click on "Download Report" to download the files in \_\_these\_\_ formats.
# Plans & Pricing
Need more information, hence pending
# Teams Settings
We understand how important your online storefront is for you. And so is team collaboration for easy dashboard management. Follow the steps ahead to make the most of Live2.ai's features for Teams & Dashboard Settings.
# Adding Team Members
**How to add members to the Team:**
* Click on “Settings”
* Click on “Team Members” from the drop down
* Click on “Invite Member"
* Enter the "Name", Select the Role from the Drop down, and the Email Address.
* The Invite will be sent to their inbox
# Updating Roles
**Update roles:**
Click on the "Team Members" from the Menu
Click on the dropdown next to the role
Select the new role
# Delete Roles
**Delete roles:**
Click on the 3 dots to the right of the team members' name
Click on "Delete"
Confirm "Delete"
kk
# Player Customization
General
{% content-ref url="/spaces/IKeumuJ1HB4kt3xN4NlD/pages/W7Qr0PjPcKxRg5cEh4Iu" %}
[Logo](/player-customization/logo)
{% endcontent-ref %}
{% content-ref url="/spaces/IKeumuJ1HB4kt3xN4NlD/pages/klP8rMYD7eprq1YoEsCM" %}
[Font](/player-customization/font)
{% endcontent-ref %}
{% content-ref url="/spaces/IKeumuJ1HB4kt3xN4NlD/pages/GzeueXoFZ9gu8to1o2zG" %}
[Play Button](/player-customization/play-button)
{% endcontent-ref %}
Product
{% content-ref url="/spaces/IKeumuJ1HB4kt3xN4NlD/pages/WgOJkXfcdS7HfwIPW3ce" %}
[Product Title Text](/player-customization/product-title-text)
{% endcontent-ref %}
{% content-ref url="/spaces/IKeumuJ1HB4kt3xN4NlD/pages/F2zV1ZwMMntQBFpSwcKy" %}
[Product Price Text](/player-customization/product-price-text)
{% endcontent-ref %}
{% content-ref url="/spaces/IKeumuJ1HB4kt3xN4NlD/pages/azZN23v2K6oTGYW0SicQ" %}
[Product Buttons](/player-customization/product-buttons)
{% endcontent-ref %}
Interactive
{% content-ref url="/spaces/IKeumuJ1HB4kt3xN4NlD/pages/yyw898N5PlZpfMKfqRpG" %}
[Interactive Overlays](/player-customization/interactive-overlays)
{% endcontent-ref %}
{% content-ref url="/spaces/IKeumuJ1HB4kt3xN4NlD/pages/mhzqI5c2EnDyDljAM3hu" %}
[Interactive Buttons](/player-customization/interactive-buttons)
{% endcontent-ref %}
# Logo
* Go to "Branding" section under Settings from the menu
* Click on the "General" tab
* Click on "Upload Logo" in order to select the file from your device \
Note: The maximum Size of the File can be 1MB & Maximum Dimensions can be 1080 x 1080 pixels
* Click on "Update"
# Font
* Go to "Branding" section under Settings from the menu
* Click on the "General" tab
* Select the Font from the dropdown under the Font section or click on "Upload Font"
* Click on "Update"
# Play Button
* Go to "Branding" section under Settings from the menu
* Click on the "General" tab
* Scroll down to the "Play Button" section and select the colors, transparency, and button size against each pointer. You can see a live preview of the same on the right of the screen.
* Click on "Update"
# Product Title Text
* Go to "Branding" section under Settings from the menu
* Click on the "Product" tab
* Select a font from the dropdown
* Click on "Update"
# Product Price Text
* Go to "Branding" section under Settings from the menu
* Click on the "Product" tab
* Select a Price Text size, Original Price Text color, and Discounted Price Text Color
* Click on "Update"
# Product Buttons
* Go to "Branding" section under Settings from the menu
* Click on the "Product" tab
* Click on "Update"
# Interactive Overlays
* Go to "Branding" section under Settings from the menu
* Click on the "Interactive" tab
* Select the Text Thickness from from the dropdown
* Click on "Update"
# Interactive Buttons
* Go to "Branding" section under Settings from the menu
* Click on the "Interactive" tab
* Add the details for Button text thickness, Border radius, 100% Display icons, Display icons style, and Display icons color.
* Click on "Update"
# Campaigns
Live2.ai allows you to interact with your viewers by creating campaigns.
{% content-ref url="/spaces/IKeumuJ1HB4kt3xN4NlD/pages/lrmy7xqTdhOG4cuIJOrf" %}
[Create a Campaign](/campaigns/create-a-campaign)
{% endcontent-ref %}
{% content-ref url="/spaces/IKeumuJ1HB4kt3xN4NlD/pages/xoTFxIuJLXr4tmClw2L0" %}
[Update a Campaign](/campaigns/update-a-campaign)
{% endcontent-ref %}
{% content-ref url="/spaces/IKeumuJ1HB4kt3xN4NlD/pages/cyM5OKsrssBJVUNvD2UY" %}
[View Campaign Performance](/campaigns/view-campaign-performance)
{% endcontent-ref %}
# Create a Campaign
# Polls
**To create a Poll Campaign, follow these steps:**
* Click on “Campaigns” from the Menu bar
* Click on “Create New Campaign” from top right of the page
* Click on “Polls” from the \_\_\_drop downs\_\_ available
* Enter the name for the Campaign and click on Create
* Select the Site Section you want to run the campaign for
* Enter the pop up and add in the question and up to \_\_#4\_\_ options for the poll.
* Add the Duration for the campaign
* Review and then click on “Save Campaign” to save it as a draft or “Save and Continue” to activate it instantly
* You can view the status (draft, scheduled, paused, active, and completed) of all campaigns on the Campaign page itself
# CTA
**To create a CTA Campaign, follow these steps:**
* Click on “Campaigns” from the Menu bar
* Click on “CTA” from the \_\_\_dropdowns\_\_ available
* Select the Site Section you want to run the campaign for
* Enter the pop up and fill the "Link" and "Text for View"
* Add the Duration for the campaign
* Review and then click on “Save Campaign” to save it as a draft or “Save and Continue” to activate it instantly
* You can view the status (draft, scheduled, paused, active, and completed) of all campaigns on the Campaign page itself.
# Q\&A
**To create a Q\&A Campaign, follow these steps:**
* Click on “Campaigns” from the Menu bar
* Click on “Create New Campaign” from top right of the page
* Click on “Q\&A” from the \_\_\_dropdowns\_\_ available
* Select the Site Section you want to run the campaign for
* Enter the pop up and add in the question
* Add the Duration for the campaign
* Review and then click on “Save Campaign” to save it as a draft or “Save and Continue” to activate it instantly
* You can view the status (draft, scheduled, paused, active, and completed) of all campaigns on the Campaign page itself
# MCQ
**To create a MCQ Campaign, follow these steps:**
* Click on “Campaigns” from the Menu bar
* Click on “Create New Campaign” from top right of the page
* Click on “MCQ” from the \_\_\_drop downs\_\_ available
* Select the Site Section you want to run the campaign for
* Enter the pop up and add in the question and up to \_\_#4\_\_ options for the MCQ.
* Review the order of options
* Add the Duration for the campaign
* Review and then click on “Save Campaign” to save it as a draft or “Save and Continue” to activate it instantly
* You can view the status (draft, scheduled, paused, active, and completed) of all campaigns on the Campaign page itself
# Ratings
**To create a Ratings Campaign, follow these steps:**
* Click on “Campaigns” from the Menu bar
* Click on “Create New Campaign” from top right of the page
* Click on “Ratings” from the \_\_\_drop downs\_\_ available
* Enter the name for the campaign and click on Create
* Select the Site Section you want to run the campaign for
* Enter the pop up and add in the question
* Select from the type of ratings formats available (Stars, Numbers, and Emojis)
* Add the Duration for the campaign
* Review and then click on “Save Campaign” to save it as a draft or “Save and Continue” to activate it instantly
* You can view the status (draft, scheduled, paused, active, and completed) of all campaigns on the Campaign page itself
# Update a Campaign
**To update a Campaign, follow these steps:**
* Go to "Campaigns" page from the menu
* Click on the particular campaign you wish to edit in order to view the details
* Click on "Edit Campaign" from the top centre bar
* Edit the details and click on "Publish" to run the campaign
* You ca
# View Campaign Performance
# Live Streaming
coming soon
# Interactive Live Commerce
coming soon
# Simulcasting
coming soon
# Shopify
Live2.ai maintains Shopify integration to make integrations as smooth as possible via Live2.ai Shopify App.
## Shopify App
Easiest way to integrate is to install Live2.ai app. This way you can automatically sync products, add widgets into your templates or pages.
```http
https://apps.shopify.com/live2ai
```
## Importing Products to Live2.ai
Before you can add products to your videos or livestreams on Live2.ai, you need to import them first. This process is straightforward. After you've successfully installed the plugin and connected your Live2.ai account, follow these steps below.
* Install live2.ai on your shopify store, for installing you need to go to the shopify store, search for live2.ai, once you find it just install it.
* Inside the live2.ai dashboard, you can see interactive stickers, dynamic frames, customization options and many more additional features.
* Now you need to click on Shopify so that the products can sync with the Live2.ai dashboard.
In this way, you can connect your Shopify store with our Live2.ai dashboard and sync the products.
# Site Sections Integration
Follow the steps to set up and integrate the Live2.ai section layout on your Shopify store. This guide provides instructions to create and implement section layouts efficiently.
* Click on **Media Library** from the left navigation bar to upload videos.
* Click the **'Upload Videos Now'** button if the Media Library is empty, or click **'Upload Video'** to add additional files when videos are already present.
New User
* To create a layout click on **Section Layouts** from the left navigation bar.
* If the Section Layout is empty, directly select your preferred layout from the options displayed. In case you have existing layouts, click **'Create New Section'**, then select your preferred layout from the options shown.
* After selecting a layout, click **'Add Videos'** to add videos to the section layout.
* Select the videos you want to include. To upload additional videos, click **'Upload Video'**. Once you have selected the videos to be included click on **Add to Section**.
* To make the section layout live on your website, click **'Publish'**. To set up Live2.ai for your store, you will have to follow the steps: Steps 1 and 2 are one-time tasks, and after that, you’ll only need to complete Step 3 for future updates.
* Go to your shopify store, On your Shopify store, click "**Add section**".
* Once you add a section, you will see two columns: one for **sections** and another for **apps.** Click on apps.
* Click on live2 embed, Once you click on live embed, there will be two options shown, “**Publish id** and **custom css**”, Paste your id that you copied previously from step 3 and paste it on the “**Publish id**” column.
* Save your changes and reload the page to apply and view your Section Layout live on the site.
# Magento
Easiest way to integrate is to Live2. ai Extension. This way you can automatically sync products, add widgets into your templates or pages.
## Extension Installation Guide
### Step 1: Install Live2.ai Module
To begin, open your terminal and use Composer to add the Live2 extension to your Magento project by running:
```
composer require live2/live2
```
This command fetches and installs the Live2 module into your Magento setup.
### Step 2: Install Codebase and Database Schemas:
Next, you need to install the codebase and update the database schemas. Run the following commands sequentially in your terminal:
```php
php bin/magento setup:di:compile
php bin/magento setup:upgrade
php bin/magento setup:static-content:deploy -f
php bin/magento indexer:reindex
php bin/magento cache:clean
php bin/magento cache:flush
```
These commands will compile the code, update the database, deploy static content, reindex data, and clear caches.
### Step 3: Update Authorization Token
* After installing the Live2 extension, Obtain the authorization token provided by the Live2 team. Then, navigate to **Store -> Configuration.**
* Go to Live2 -> Live2 Token. In the URL enter [https://console.live2.ai](https://console.live2.ai/) and Token will be provided to you by Live2.ai at the time of integration.
### Step 4: To Embed Videos follow these steps:
* Go to **Content -> Pages**
* Select the page where you want to embed the video, click on Edit. For this example we are considering Home Page
* Click on Content
* Click on Insert Widget
* Select SocialWalls Widget from the dropdown, and enter the Embed Id generated from the Live2.ai social wall console dashboard.
* After the Widget is successfully added click on Save
* Go to Content → Pages. Click on View for the page the embed was created.
* You will be able to see the preview of the live embed
### Step 5: Enable Product Sync
Enable the product synchronization feature to sync your catalog with Live2. Run the following command:
```
bin/magento live2:productSync
```
# Integration Guide Custom Store Shoppable Videos
By embedding the Live2.ai JS script on your website, you gain access to various Live2.ai widgets to display embeds.
## Integration
Insert this code block in the \ of the page.
```
HTML:
```
To Position the Live2.ai component in the desired location insert the following code block in the \ of the page.
```
# Integration Guide For Social wall Custom Store
## 1. Integrating Social wall into SDK
* Insert this code block in the `` of the page.
| \ |
| ------------------------------------------------------------------------------------------------ |
* To Position the Live2.ai social wall component in the desired location insert the following code block in the \ of the page.
Paste the `publish_id` generated from live2.ai console.
The `team_id` will be given by Live2.ai’s team at the time of integration.
|
|
| -------------------------------------------------------------------------------------------------------------------------------------------------------------------------------------------------------------------------------------------------------------------------------------------------------------------------------------------------------------------------- |
\
# Insights
The Insights feature provides key analytics on site section loads, video views, average time spent, and unique visitor statistics.
The Insights feature provides analytics about the site's usage. Here are the key points based on it:
* **Site Section Loads**: Shows the number of times site sections were loaded.
* **Average Time Spent**: Displays the average time users spend watching videos per day.
* **Video Views**: Count of the number of times a video was viewed in fullscreen mode.
* **Unique Visitors**: Indicates the number of unique users who landed on the page where site sections were loaded.
* **Graphs**: Visual representations of data over time, including insights such as site section loads and average time spent.
* **Device Distribution**: Provides a breakdown of traffic and interactions by device type, such as mobile versus desktop.
* **Top Performing Videos**: Highlights the most popular videos with metrics like total views and time spent on each.
# Product/Collection Embed
As we are aware that shopify runs on pages, So there are two kinds of embeds which focus on embeds based on product and collection pages.
## Shopify App
Easiest way to integrate is to install Live2.ai app. This way you can automatically sync products, add widgets into your templates or pages.
```http
//https://apps.shopify.com/live2ai
```
## Integration Process Overview
The entire integration process remains the same up until the copying and publishing steps. For these steps, you can refer to the Shopify integration guide provided above.
```http
/https://app.gitbook.com/o/2gIQkI4Syk0ZTEcnsxs9/s/HSKKq0QM2gaTSowM8icH/
```
## Understanding Product Embeds in Shopify Templates
In Shopify, pages are built from templates, and product pages use the same template. Therefore, when we add a product to a template, we are adding it to that page. This is why we use a product embed.
## Adding a Section in Your Shopify Store
In a Shopify store, we will add a section as we normally do. This will direct us to two columns: **Sections** and **Apps.** We need to click on the Apps column.
* Click on Apps, and **paste the ID** provided by the team. Once you do this, your product will go live on the product page.
## Applying Collection Embed and Publishing Changes
Similarly, you need to perform the same steps for the collection page. Instead of selecting the **Product Embed**, choose the **Collection Embed** for the collection page.
After selecting the **Collection Embed** for the collection page, follow these steps:
* **Click on Apps** and paste the ID provided by the team.
* **Save** your changes to ensure the embed is applied.
* **Publish** the collection page to make it live.
# Android SDK
The Android SDK (Software Development Kit) is a collection of tools and resources that developers use to create applications for Android devices. It includes libraries, documentation, and sample code to help build and test Android apps.
# Getting Started with Android SDK
## About
The Firework Android SDK is a library offering various programming interfaces for developers to embed video feeds from Firework, a platform specializing in shoppable videos and livestreams, into an Android application.
## Requirements
Live2.ai is compatible with the following:
* Android min SDK 21
* Kotlin/Java code base
* Gradle build system
## Retrieve your Auth Token
To integrate the Live2.ai Android SDK into your application, you need to register your application with the Live2.ai platform and obtain a unique auth token ID. To get the auth token ID, you should:
1. Register your application with the Live2.ai platform.
2. Obtain your unique auth token.
## Integrating Live2.ai Android SDK
To access the latest stable version of a library package from MavenCentral, ensure that your project is configured to use the MavenCentral repository in your `build.gradle` or `build.gradle.kts` file.
```gradle
Gradle:
repositories {
...
mavenCentral()
}
```
Include these dependencies according to your needs:
* **Live2.ai SDK:** This is the core dependency for initializing the Live2.ai Android SDK and supporting video and livestream functionalities.
## SDK Initialization
Call this code in your custom application class or in MainActivity `onCreate` method to initialize the Live2.ai SDK:
```kotlin
Kotlin:
class MainActivity : AppCompatActivity() {
private lateinit var binding: ActivityMainBinding
override fun onCreate(savedInstanceState: Bundle?) {
super.onCreate(savedInstanceState)
binding = ActivityMainBinding.inflate(layoutInflater)
setContentView(binding.root)
val live2 = Live2SDK.installer(application, this)
.userId(USER_ID) // Optional field to set the User ID in your eco-system.
.authToken(TOKEN) // Client OAUTH Id
.muteOnLaunch(false)
.enableCaching(true)
.maxCacheSizeBytes(MAX_CACHE_SIZE_IN_BYTES) // Max cache size used by video players, 25MB by default
.enableForwardBackwardGestures(true)
.enablePiP(true)
.build()
}
}
```
## BOM (Bill of Material)
Since Live2.ai is developing multiple SDKs for various purposes, which might result in dependency conflicts, we have introduced a BoM (Bill of Materials) solution. This approach is useful when your app relies on multiple Live2.ai SDKs or open-source libraries from Live2.ai.
With this solution, your project's Gradle file should only specify the platform dependency with the latest BoM version.
```gradle
Gradle:
val live2BomVersion = "latest_live2_bom_version" // eg. 1.0.1
implementation(platform("com.live2:live2-bom:$live2BomVersion"))
// no version is needed
implementation("com.live2:core")
implementation("com.live2:ui")
implementation("com.live2:player")
```
## Setup your project
We recommend setting `android:largeHeap="true"` in the `application` tag within your `AndroidManifest.xml` file.
```
......
```
# Site Sections (Android)
When you integrate the Live2.ai SDK into your application, you gain access to a library of millions of videos. You can make these videos available in your app based on both app-specific and user-specific configurations and preferences. In this integration guide and the API reference documentation, the collection of videos based on these configurations and preferences is referred to as "Video Feed" or "video feed" and collectively as "Video Feeds" or "video feeds."
# Carousel (Android)
## Setting up Carousel
To set up the Carousel, the host application must invoke the `init()` function, which requires both the context and the embed Id. These are essential fields, embed id can be obtained from the live2.ai dashboard.
```kotlin
Kotlin:
val carouselView: SiteSectionContainer = findViewById(R.id.carouselView)
carouselView.init(context = this, embedId = Constants.CAROUSEL_EMBED)
```
## Carousel Layout
XML Layout:
```xml
```
* Enabling video previews on the L1 screen: Set `app:enablePreview="true"` to allow video previews on the L1 screen.
* Disabling video previews on the L1 screen: Set `app:enablePreview="false"` to prevent video previews from being displayed on the L1 screen.
# Story (Android)
## Setting Up `Story`
To set up the Story, the host application must invoke the `init()` function, which requires both the context and the embed Id. These are essential fields, embed id can be obtained from the live2.ai dashboard.
```kotlin
Kotlin:
val storyView: SiteSectionContainer = findViewById(R.id.storyView)
storyView.init(context = this, embedId = Constants.STORY_EMBED)
```
## Story Layout
XML Layout:
```xml
```
* Enabling video previews on the L1 screen: Set `app:enablePreview="true"` to allow video previews on the L1 screen.
* Disabling video previews on the L1 screen: Set `app:enablePreview="false"` to prevent video previews from being displayed on the L1 screen.
# Window ( Android)
## Setting Up `Window`
To set up the Window, the host application must invoke the `init()` function, which requires both the context and the embed Id. These are essential fields, embed id can be obtained from the live2.ai dashboard.
```kotlin
Kotlin:
val storyWindowView: SiteSectionContainer = findViewById(R.id.StoryWindowView)
storyWindowView.init(context = this, embedId = Constants.STORY_WINDOW_EMBED)
```
## Window Layout
XML Layout:
```xml
```
* Enabling video previews on the L1 screen: Set `app:enablePreview="true"` to allow video previews on the L1 screen.
* Disabling video previews on the L1 screen: Set `app:enablePreview="false"` to prevent video previews from being displayed on the L1 screen.
# Floating Window (Android)
## Setting Up `Floating Window`
To set up the Floating Window the host application must invoke the `init()` function, which requires both the context and the embed Id. These are essential fields, embed id can be obtained from the live2.ai dashboard.
```kotlin
Kotlin:
val floatingWindow: FloatingWindow = findViewById(R.id.floatingWindow)
floatingWindow.init(this, FLOATING_WINDOW_EMBED)
```
## Floating Window Layout
XML Layout:
```xml
```
* If `autoplayNextVideo="true"`, videos will automatically play one after another. If set to "false," the next video won't play automatically.
* Setting `autoplayNextVideo` to "true" ensures continuous playback of videos without manual intervention. Setting it to "false" stops this functionality.
* If `enableDrag="true"`, you can drag the video across the entire L1 screen. If set to "false," this feature is disabled.
* The `enableDrag` attribute allows for video repositioning on the screen when set to "true"; disabling it restricts movement.
## Note:
Setting `android:layout_width="match_parent"` and `android:layout_height="match_parent"` is essential, without it, the video won't be draggable.
# Group Story (Android)
## Setting Up `Group Story`
To set up the Group Story, the host application must invoke the **`init()`** function, which requires both the context and the embed Id. These are essential fields, embed id can be obtained from the live2.ai dashboard.
```kotlin
Kotlin:
val groupStory: SiteSectionContainer = findViewById(R.id.groupStoryView)
groupStory.init(context = this, embedId = GROUP_STORY_EMBED)
```
## Group Story Layout
XML Layout:
```xml
```
* Enabling video previews on the L1 screen: Set **`app:enablePreview="true"`** to allow video previews on the L1 screen.
* Disabling video previews on the L1 screen: Set **`app:enablePreview="false"`** to prevent video previews from being displayed on the L1 screen.
# Grid (Android)
## Setting Up `Grid`
To set up the Grid, the host application must invoke the `init()` function, which requires both the context and the embed Id. These are essential fields, embed id can be obtained from the live2.ai dashboard.
```kotlin
Kotlin:
val gridView: SiteSectionContainer = findViewById(R.id.gridView)
gridView.init(context = this, embedId = Constants.GRID_EMBED)
```
## Grid Layout
XML Layout:
* Enabling video previews on the L1 screen: Set `app:enablePreview="true"` to allow video previews on the L1 screen.
* Disabling video previews on the L1 screen: Set `app:enablePreview="false"` to prevent video previews from being displayed on the L1 screen.
* The `app:numberOfColumns` attribute specifies the number of vertical columns in the grid layout, displaying that number of columns.
# Analytics (Android)
Analytics for Live2.ai tracks and analyzes user interactions and livestream performance to improve content and user experience.
## Live2.ai Analytics
Before diving into analytics events, let's review how to register and unregister for analytics tracking on Live2.ai. Follow the steps in the Live2.ai documentation.
## **Now let's see how to subscribe to the specific analytics event:**
To manage the lifecycle of the view efficiently, simply pass the LifecycleOwner. By doing so, the view will automatically be bound to its lifecycle, eliminating the need for manual registration or unregistration. This approach ensures that the view's lifecycle is properly handled, reducing the risk of memory leaks and simplifying the code.
```kotlin
Kotlin:
subscribe(this@MainActivity) { event ->
when (event.keyword) {
API_REQUEST_START -> { catchCommonData(event.data) }
API_REQUEST_END -> { catchCommonData(event.data) }
EMBED_LOAD_START -> {catchL1EventsData(event.data)}
EMBED_LOAD_FAIL -> {catchL1EventsData(event.data)}
EMBED_LOAD_SUCCESS -> {catchL1EventsData(event.data)}
VIDEO_CONTROL_CLICK -> {catchL2EventsData(event.data)}
VIDEO_VIEW -> { catchL2EventsData(event.data) }
VIDEO_SWIPE -> { catchL2EventsData(event.data) }
PRODUCT_CTA_CLICK -> { catchL2EventsData(event.data) }
PRODUCT_CARD_CLICK -> { catchL2EventsData(event.data) }
PLAYER_VIEW_LAUNCH -> { catchL2EventsData(event.data) }
PRODUCT_DETAILS_OPEN -> { catchL2EventsData(event.data) }
CAMPAIGN_RESPONSE_SUBMIT -> { catchL2EventsData(event.data) }
CAMPAIGN_EXPAND_CLICK -> { catchL2EventsData(event.data) }
}
}
```
**API\_REQUEST\_START-** Signifies the beginning of an API request.
**API\_REQUEST\_END-** Indicates the completion of an API request.
**EMBED\_LOAD\_START**- Signifies the beginning of the process to load an embedded content or resource.
**EMBED\_LOAD\_FAIL-** Indicates that the attempt to load an embedded resource has failed.
**EMBED\_LOAD\_SUCCESS -** Signifies that the embedding of content has been successfully completed without errors.
**VIDEO\_CONTROL\_CLICK-** Represents an event triggered when a user interacts with video control buttons, such as play, pause, or skip.
**VIDEO\_VIEW-** Typically represents an event where a video has been viewed or interacted with in a media application.
**VIDEO\_SWIPE-** Typically refers to an event where the user swipes across a video, often used to trigger interactions such as skipping, seeking, or revealing additional content.
**PRODUCT\_CTA\_CLICK**- Represents an event where a user clicks on a "Call to Action" button related to a product.
**PRODUCT\_CARD\_CLICK-** Typically indicates a user interaction with a product card, often triggering details or actions related to that product.
**PLAYER\_VIEW\_LAUNCH-** Indicating the initiation of a player view in a media application.
**PRODUCTS\_DETAILS\_OPEN-** Represents an event triggered when a user opens a product details page in an application or website.
**CAMPAIGN\_RESPONSE\_SUBMIT**- Represents an event indicating that a user has submitted a response or feedback related to a campaign.
**CAMPAIGN\_EXPAND\_CLICK**- Typically represents an event triggered when a user clicks to expand a campaign or promotional content.
## Handling Specific Event Data in Your Application
To effectively handle particular event data, you need to manage the events through dedicated functions. Below is a structured approach to handle different levels of events (L2, L1, and Common events) with the corresponding code snippets:
## 1). Handling L2 Events Data
To capture L2 events data, implement the **`catchL2EventsData`** function. This function uses a `when` statement to handle various types of L2 events, such as video control clicks, video views, video swipes, product CTA clicks, and more.
```kotlin
Kotlin:
private fun catchL2EventsData(eventData: Any) {
when(eventData) {
is L2Events.VideoControlClick -> {
// Handle VideoControlClick event
}
is L2Events.VideoView -> {
// Handle VideoView event
}
is L2Events.VideoSwipe -> {
// Handle VideoSwipe event
}
is L2Events.ProductCTAClick -> {
// Handle ProductCTAClick event
}
is L2Events.PlayerViewLaunch -> {
// Handle PlayerViewLaunch event
}
is L2Events.VideoThumbnailClick -> {
// Handle VideoThumbnailClick event
}
is L2Events.ProductCardClick -> {
// Handle ProductCardClick event
}
is L2Events.ProductDetailsPage -> {
// Handle ProductDetailsPage event
}
is L2Events.CampaignExpandClick -> {
// Handle CampaignExpandClick event
}
is L2Events.CampaignSubmitClick -> {
// Handle CampaignSubmitClick event
}
}
}
```
## 2). Handling L1 Events Data
Similarly, to capture L1 events data, define the **`catchL1EventsData`** function. This function is designed to handle events related to the embed load process, including start, success, and failure events.
```kotlin
Kotlin:
private fun catchL1EventsData(eventData: Any) {
when(eventData) {
is L1Events.EmbedLoadStart -> {
// Handle EmbedLoadStart event
}
is L1Events.EmbedLoadSuccess -> {
// Handle EmbedLoadSuccess event
}
is L1Events.EmbedLoadFail -> {
// Handle EmbedLoadFail event
}
}
}
```
## 3) Handling Common Events Data
For common events, use the **`catchCommonData`** function. This function deals with API-related events, specifically the start and end of API calls.
```kotlin
Kotlin:
private fun catchCommonData(eventData: Any) {
when(eventData) {
is CommonEvents.ApiEnd -> {
// Handle ApiEnd event
}
is CommonEvents.ApiStart -> {
// Handle ApiStart event
}
}
}
```
## Summary
By organizing event handling into distinct functions (**`catchL2EventsData`, `catchL1EventsData`, and `catchCommonData`),** you ensure that each type of event is managed appropriately. This approach enhances code readability, maintainability, and scalability, making it easier to add or modify event handling logic in the future.
# In-app Language Switches
The Live2.ai Android SDK supports the host app in dynamically changing languages at runtime. There are no specific API requirements for the host app to leverage this feature. The host app can implement its own mechanism for overriding the context, and the Live2.ai Android SDK will automatically update the **`PlayerActivity`'s `BaseContext`** to the desired locale. This update ensures that resources and layout alignment (LTR/RTL) reflect the current locale.
```kotlin
Kotlin:
class InAppLanguageActivity : FragmentActivity() {
override fun onCreate(savedInstanceState: Bundle?) {
super.onCreate(savedInstanceState)
setContentView(R.layout.activity_in_app_language)
}
override fun attachBaseContext(newBase: Context) {
super.attachBaseContext(LanguageHelper.changeLanguage(newBase))
}
override fun onCreateOptionsMenu(menu: Menu?): Boolean {
menuInflater.inflate(R.menu.in_app_toolbar, menu)
return true
}
override fun onOptionsItemSelected(item: MenuItem): Boolean {
return when (item.itemId) {
R.id.menu_en -> handleLanguageChange(getString(R.string.in_app_language_en))
R.id.menu_hi -> handleLanguageChange(getString(R.string.in_app_language_hi))
R.id.menu_de -> handleLanguageChange(getString(R.string.in_app_language_de))
else -> super.onOptionsItemSelected(item)
}
}
private fun handleLanguageChange(languageCode: String): Boolean {
LanguagePreference.setLocalePreference(this, languageCode)
recreate()
return true
}
}
```
# Interactive Stickers & Frames
Enhance your videos with interactive stickers and frames to create more engaging and dynamic content.This guide will walk you through the steps to integrate these elements seamlessly.
## Adding and Positioning Stickers on Your Video
* Click on **Interactive Stickers** from the left navigation bar, then select **Create New Sticker** to begin.
* Choose the video where you want the sticker to be added.
* Select the desired sticker and position it where you want it to appear.
* Save your changes to ensure the sticker is added to the video.
* After saving, refresh your site to see the updated changes.
## Adding and Positioning Frames on Your Video
Here’s how to add and position frames:
* Click on **Adaptive Frames** from the left navigation bar, then select **Create New Frame** to begin.
* Choose the video where you want the frame to be added.
* Toggle on the **Seasonal Frames** option and choose the frame you'd like to use. Save your changes to ensure the frame is added to the video.
* After saving, refresh your site to see the updated changes.
# Interactive Elements
Our shoppable video product includes a feature set for adding interactive elements, such as polls, multiple-choice questions (MCQs), Q\&A sections, and calls-to-action (CTAs).These tools enable direct audience engagement within the video, encouraging interaction and collecting valuable insights to better understand viewer preferences.
# Poll
With the poll feature, you can design interactive campaigns that engage viewers directly within your video, allowing you to gather real-time feedback and insights.
## Setting up Polls:
* Go to **Interactive Elements** in the left navigation bar, then select "Polls" from the dropdown menu and click on **Create Poll** to begin.
* Type your poll question and provide options for the answers. Then, select the desired date range for your campaign to run.
* Click **Save and continue** to create your poll. To add videos to your campaign, click **Add to Videos** and select videos you want the campaign to be applied for, you can also upload new videos from your system. Click on **Add to Campaign.**
* Click on **Run Campaign** to activate it.
* Refresh your site to view the updated changes.
# MCQs
The MCQ feature allows you to embed multiple-choice questions directly into your videos. This enables interactive audience engagement while gathering valuable real-time insights.
## Setting up MCQs
* Go to Interactive Elements in the left navigation bar, then select "MCQ" from the dropdown menu and click on **Create MCQs** to begin.
* Type your mcq question and provide options for the answers. Then, select the desired date range for your campaign to run.
* Click **Save and continue** to create your MCQ campaign. To add videos to your campaign, click **Add to Videos** and select videos you want the campaign to be applied for, you can also upload new videos from your system. Click on **Add to Campaign**.
* Click on Run Campaign to activate it.
* Refresh your site to view the updated changes.
# Q\&A
The Q\&A feature lets you integrate interactive question-and-answer sections into your videos, enhancing viewer engagement and allowing you to gather real-time feedback.
## Setting up QnAs
* Go to Interactive Elements in the left navigation bar, then select "QnA" from the dropdown menu and click on **Create QnAs** to begin.
* Type your QnA question and select the desired date range for your campaign to run.
* Click **Save and continue** to create your QnA campaign. To add videos to your campaign, click **Add to Videos** and select videos you want the campaign to be applied for, you can also upload new videos from your system. Click on **Add to Campaign**.
* Click on **Run Campaign** to activate it.
* Refresh your site to view the updated changes.
# CTA
The CTA feature lets you add clickable buttons within your videos, guiding viewers to take specific actions, such as visiting a website, driving engagement and achieving campaign goals.
## Setting Up Call-to-Action (CTA):
* Go to Interactive Elements in the left navigation bar, then select **CTA** from the dropdown menu and click on Create CTAs to begin.
* A section will appear where you can customize your CTA. Enter the relevant details, such as the CTA text and the URL you want to link to (it can be a product link, informative link, or any other relevant URL based on your usecase). Select the desired date range for your campaign and choose when you want it to go live.
* Click **Save and continue** to create your CTA campaign. To add videos to your campaign, click **Add to Videos** and select videos you want the campaign to be applied for, you can also upload new videos from your system. Click on Add to Campaign.
* Click on **Run Campaign** to activate it.
* Refresh your site to view the updated changes.
# Interactive Media Journey
Branching Videos guide your audience on a personalized journey, allowing them to choose their own path and discover relevant content. It leads to enhanced viewer engagement and drives sales by connecting them with tailored experiences that cater to their interests.
* Click on **Interactive Media Journey** from the left navigation bar, then select **Create New** to begin.
* A screen will appear prompting you to add a videos on the screen, with the options below it.
* Select the video you want to upload
* When a video is uploaded, you need to select options indicating what you want, as this will act as a parent video.
* Now, you need to add options for both nodes that are linked to a parent video.
* Now, when you click on the nodes, you will see three choices: **video, URL, or delete**. It's up to you to decide which one to select.
* If you choose "**Video,**" you can add additional child videos. If you choose "**URL**," it will automatically be redirecting you to the website. For example, if you choose "Video," you will have to add the next video you want the user to redirect to.
* If you choose "URL," you will have to add the URL link where you want the user to redirect to.
* Click on **Share**, enter a title, and then click **Save** to create your branching video.
* After creating your branching video, you need to create a section layout where you can include the video. This will ensure that the branching video is visible within the selected section layout on your site. To create a layout click on **Section Layouts** from the left navigation bar.
* Select your preferred layout from the options shown. You will be redirected to a page where you can add your branching videos by clicking on '**Add Videos'.**
* Select the video and click to **add it to the section**.
* To make the section layout live on your website, click **'Publish'**. To set up Live2.ai for your store, you will have to follow the steps: Steps 1 and 2 are one-time tasks, and after that, you’ll only need to complete Step 3 for future updates.
* Once done, click on '**Next,**' copy the publish '**ID,**' and mark it as done.
* For the next steps, follow the same integration process as explained in **Site Sections integration. Add a section** from your shopify store, under apps click on "**Live2 Embed**," and **paste the embed ID** that you copied previously. Once done, **save** the changes, and your branching videos will go live on your website.
# Connect your socials
### Step 1
To start creating social walls, please connect your social media accounts when landed on the page.
### Step 2
To connect your social media accounts to the Live2.ai dashboard, you will need to log in to the respective social media platforms.
# Fetch & Curate Content
## How to fetch content from social media platforms
### Step 1
Go to the 'Fetch Posts' page on your left navigation bar
### Step 2
Enter your brand campaign hashtags in the search box. You can also specify the timeline to retrieve posts from.
### Step 3
The respective posts will be fetched from the social media platform and displayed in this page.
## How to curate content and add to your library
### Step 1
• After reviewing and evaluating the fetched content, select videos by clicking the checkbox in the left corner.
• Once you have curated the posts, you can add the posts by clicking on the 'Add to Library' button on the right.
### Step 2
Your curated posts will be moved to your library under 'Curated Media' tab. You can use them in any of your social wall.
---
[Next Page](/llms-full.txt/1)
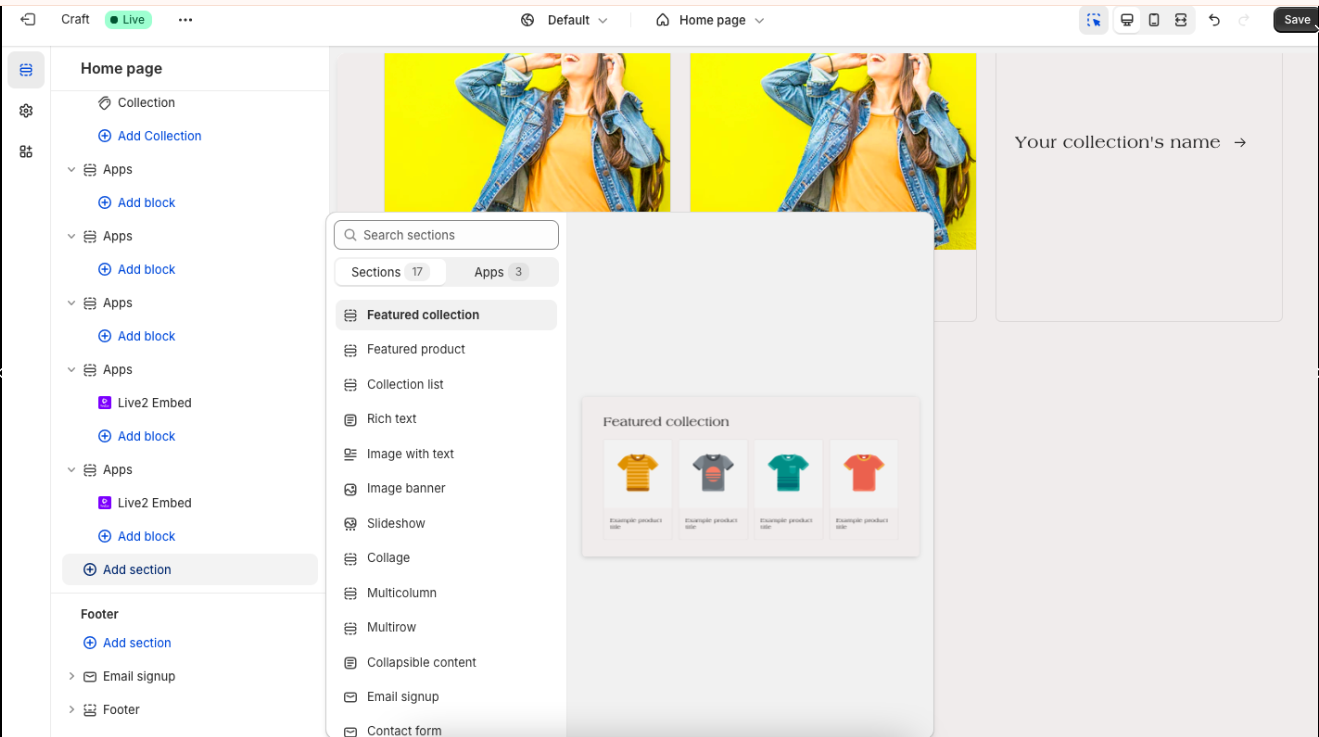
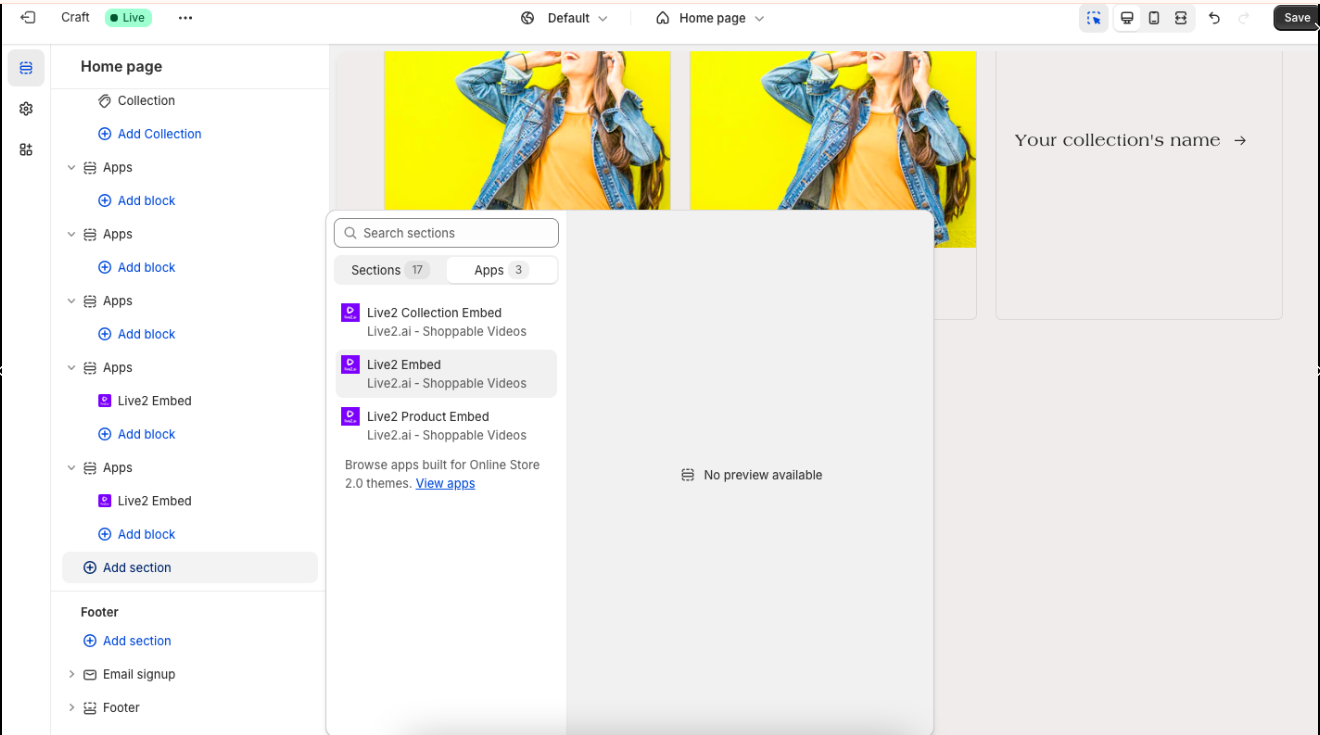
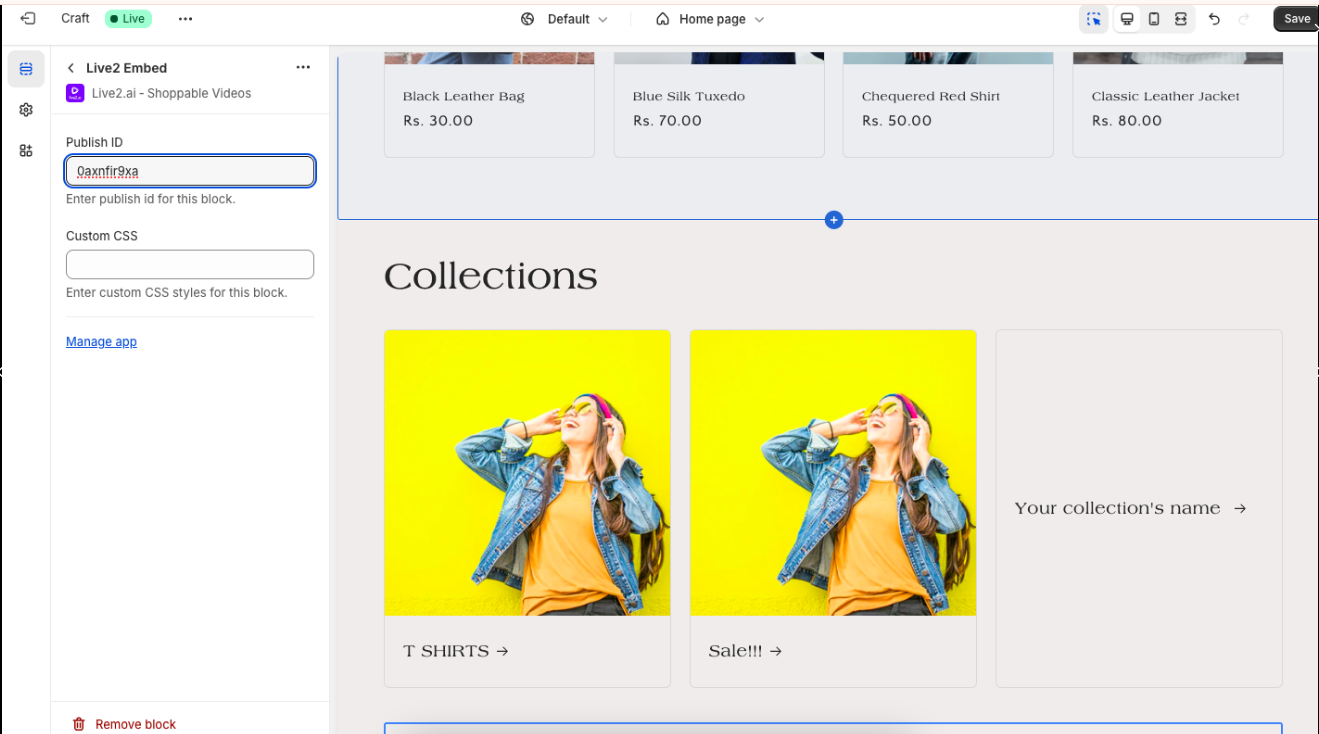
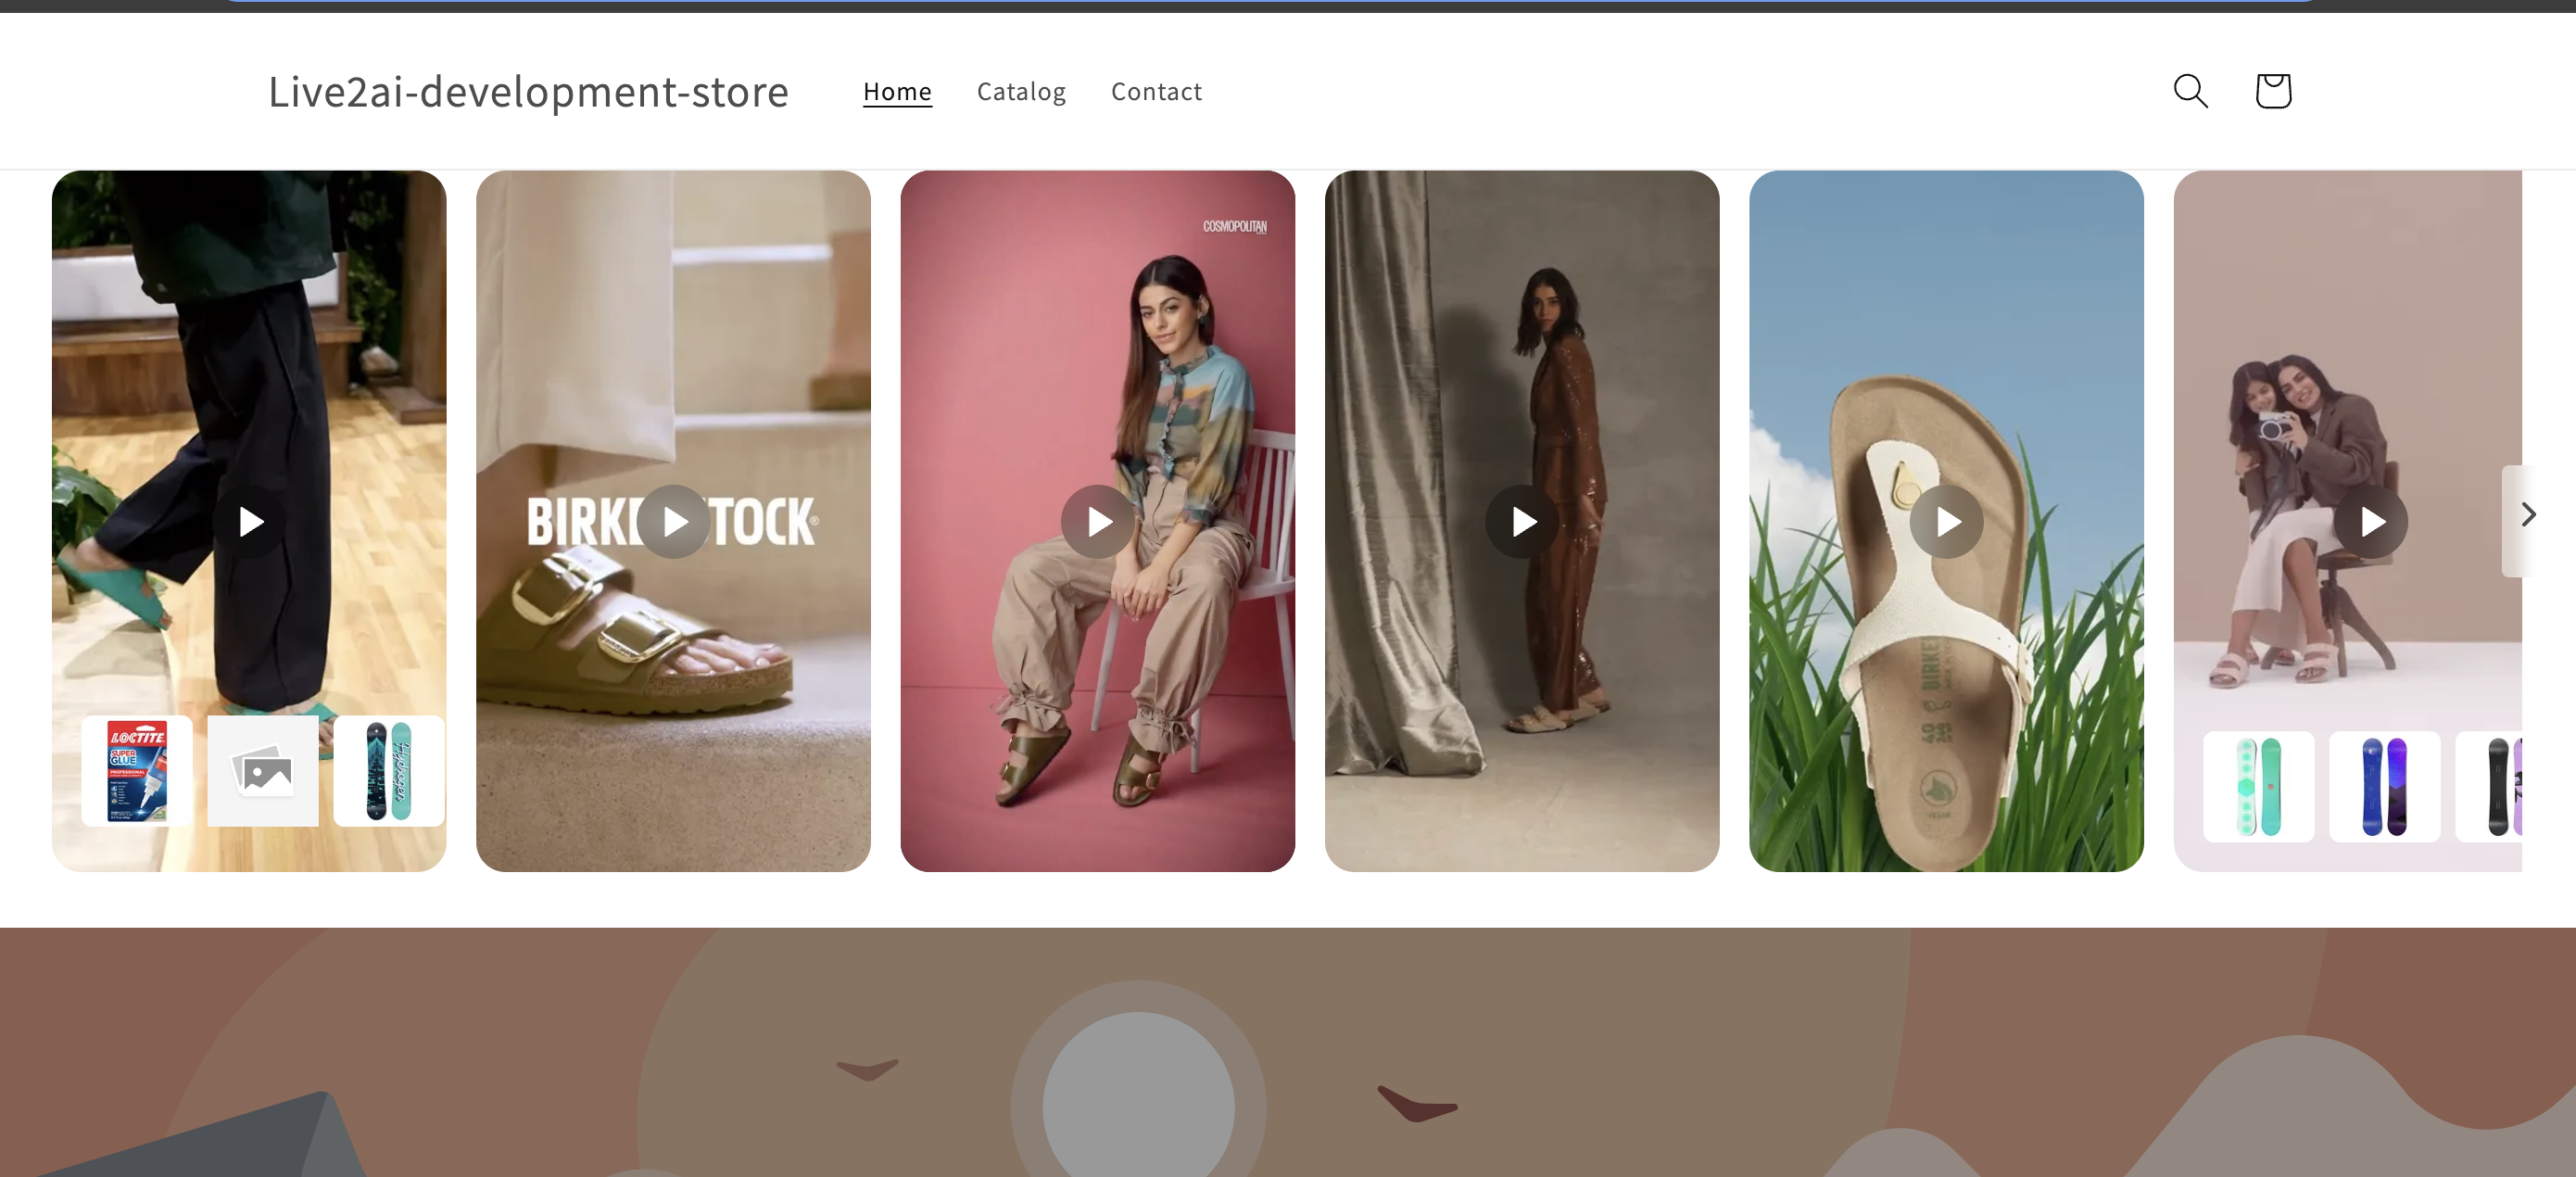
.png?alt=media&token=8e1bec81-6f85-4af7-90f5-f238b41f3474)
.png?alt=media&token=a4a1a247-f690-48c2-a7f4-defaab016d42)
.png?alt=media&token=de53be2e-fa75-4fec-88c2-e532f05efc50)
.png?alt=media&token=7e96fd1d-9f8d-4b21-a4cb-f2e89d1b1aba)